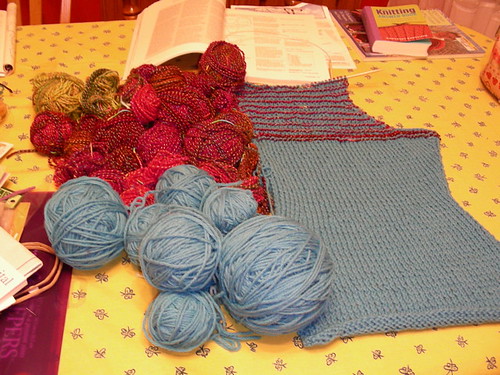
Does this yarn look vaguely familiar to you? Kelle referenced this by
saving "I know what you un-did last night..." Yes, it is true- I
frogged a complete sweater, post seaming, post several wearings. The
yarn to the left of the cardigan front is the rest of the former
sweater.
Why? you ask- Because I could, and because I believe I can knit it
better, to fit me. Notice those drastic waist decreases, and improved
armhole shaping, extended length, etc. I even took the liberty to
change the garter stitch like pattern, and knit the Cascade 220 blue
yarn in stockinette stitch, and alternated with the Noro Kujaku done in
2 rows of garter. I wanted the Noro yarn to show through more, and now
it does. In fact, I really like the way it looks so far.
I bought the best knitting design book, possibly ever, called
"Designing Knitwear." It was just what I needed. It offers all sorts of
mathy ways to make your sweater fit, just like I wanted it to do. Of
course the true test will be the seaming.
So far I have knit nearly both cardigan fronts. Next will be the back,
then the sleeves.
In the total frogging I spent 2 days unseaming the sweater (I had
twisted the alternate yarn together to carry it up the striping sides),
and a day unwinding the yarn, and winding it into hanks, then I
carefully washed and dried it, weighted with plastic hangers to get the
kinks out. I had to wait 2 days for it to dry, then wound it in balls.
Then, I carefully measured 2 favorite sweaters, one was from Express,
the other from J Crew, to find ideal sweater measurements.
I liked the original design I had knit, which utilized the extra inches
of knit fabric to fold down and to the inside to form a long hem and a
jacket-like look and feel to the cardigan. So I planned this extra
material into the pattern. I mostly winged it with the shapings, using
k2tog, and ssk decreases 2 sts in from the edges till the waist
shaping. At that point I did the decreases carefully spaced into the
rows, to achieve a waist-like decrease. Then, I increased knitting into
the front and back of the stitch 2 sts in from the end of the right
side rows until I reached the bust size.
At that point I did the armhole decreases on the right sides, on every
right side row, and did shaping for the neckline. I completed the front
piece by a three tier binding off to create shoulder shaping.
How is this different from the original pattern? Jane Ellison is the
designer who created the Gloria sweater in the Noro book. Her design
had too deep of armholes for me, and the shoulder shaping hit me at the
wrong places, after my shoulders. On the model in the book the sweater
looks shapely and fitted, on me it did not. I changed the st pattern
that was all garter stitch, added waist shaping, lengthened the
sweater, added additional shoulder shaping, and decreased the armhole
depth. I am also planning to add the bottom garter sittch "hem" later,
after seaming the sweater so it can be one continuous piece with colors
that transition smoothly. I will change the sleeves too, so they don't
hang down so much, and make them shapely, like they were on this
sweater the last time I knit it. That's all. Not too different, eh?

2 comments:
ooweeee! Man I still can't believe you did that! I does look good so far though so the frogging was not all in vain. Will you be working on this sweater in DC?
You've been up to trouble?
Yeah, I'd say.
What patience you must have.
I love all of your pictures. Great posts.
Post a Comment